使うモノ
- Visual Studio 2010
- Microsoft DirectX SDK February 2010
- .NET Framework 4
- SlimDX SDK
- Microsoft Direct X 10 SDK (latest release; currently February 2010)
- SlimDX-ColladaLoader-1.0.zipをダウンロード
手順(基本はこちらで公開されているチュートリアルより)
- まずはSlimDX SDKをインストール
- スタートメニュー -> SlimDX SDK -> Samples -> Install Samplesでサンプルを展開
- こちらからSlimDX-ColladaLoader-1.0.zipをダウンロード、解凍。
- サンプルモデルをダウンロードし、それぞれを以下のように配置
Folder
 +-ColladaLoader
 +-SampleFramework
 +-SimpleModel10
   +-Effects
   +-Models
   +-...
ColladaLoader
- ColladaLoaderフォルダ下のColladaLoader.slnをvisual studioで開く
- (.ump)ファイルがひらけないと出るが、無視。(UMLのデータは使わないので)
- もし、以下のような警告が出ているようならば、ターゲットに指定された.NETのバージョンを変更
The primary reference "Microsoft.CSharp", which is a framework assembly, could not be resolved in the currently targeted framework. ".NETFramework,Version=v2.0". To resolve this problem, either remove the reference "Microsoft.CSharp" or retarget your application to a framework version which contains "Microsoft.CSharp".	ColladaLoader
...
-
- Solution Explorerで、プロジェクト名を右クリックしプロパティー、target frameworkを.Net Framework4に変更
- referenceでSlimDXがきちんと参照されていない場合は、一端削除し、Add Reference -> Browse でインストール先フォルダ内のdllを参照
- 例:C:\Program Files (x86)\SlimDX SDK (March 2011)\Bin\net20\x64\SlimDX.dll
- ビルドしようとすると、バージョンの違いによってか以下のような警告が出た。
Warning	1	'SlimDX.Direct3D10.InputLayout.InputLayout(SlimDX.Direct3D10.Device, SlimDX.Direct3D10.InputElement[], SlimDX.D3DCompiler.ShaderSignature)' is obsolete: 'Use the constructor overload taking a ShaderSignature as the second argument instead.'	C:\3dview\ColladaLoader\Mesh\ColoredMesh.cs	53	23	ColladaLoader
Error	2	The name 'ShaderFlags' does not exist in the current context	C:\3dview\ColladaLoader\Mesh\TexturedMesh.cs	54	95	ColladaLoader
Error	3	The name 'EffectFlags' does not exist in the current context	C:\3dview\ColladaLoader\Mesh\TexturedMesh.cs	54	113	ColladaLoader
Warning	4	'SlimDX.Direct3D10.InputLayout.InputLayout(SlimDX.Direct3D10.Device, SlimDX.Direct3D10.InputElement[], SlimDX.D3DCompiler.ShaderSignature)' is obsolete: 'Use the constructor overload taking a ShaderSignature as the second argument instead.'	C:\3dview\ColladaLoader\Mesh\TexturedMesh.cs	59	23	ColladaLoader
Error	5	The name 'ShaderFlags' does not exist in the current context	C:\3dview\ColladaLoader\Mesh\ColoredMesh.cs	48	94	ColladaLoader
Error	6	The name 'EffectFlags' does not exist in the current context	C:\3dview\ColladaLoader\Mesh\ColoredMesh.cs	48	112	ColladaLoader
FLayout = new InputLayout(FDevice, PositionColored.InputElements, FPass.Description.Signature);
- 新しいバージョンでは、2つめと3つめのargumentが入れ違っているというので、2カ所ともこれらを交換
FLayout = new InputLayout(FDevice, FPass.Description.Signature, PositionColored.InputElements);
- そして、ColoredMesh.csとTextureMesh.csそれぞれにおいて、SlimDX.D3DCompilerを参照するように追加
using SlimDX.D3DCompiler;
- Effect.FromFileのargumentも変更が加わったようで、新たに以下が追加されていたため、単純に最後の2つのnullを消す。
Effect Effect.FromFile(Device device, string fileName, string profile, ShadeFlags shaderFlags, EffectFlags effectFlags)
SampleFramework
- 次にSampleFramework下のSampleFramework.csprojを開く
- Solution Explorerで、プロジェクト名を右クリックしプロパティー、target frameworkを.Net Framework4に変更
- referenceでエラーが起きてたので先ほどと同様に、SlimDXを一端removeし、add referenceでインストールしたSlimDXを参照
- ビルドする
SlimDX
- SimpleModel10下のSimpleModel10.csprojを開く
- Solution Explorerで、プロジェクト名を右クリックしプロパティー、target frameworkを.Net Framework4に変更
- 先ほどと同様に、SlimDXの参照先も修正。
- Sample Frameworkもエラーを起こしていたので、いったん取り除き、先ほどビルドして作ったSampleFramework.dllを参照
- 例:C:\3dview\SampleFramework\bin\Debug\SampleFramework.dll
- この状態でビルドして実行してみると、初期のサンプルの木星が表示される。
Collada(.dae)形式の図形の表示
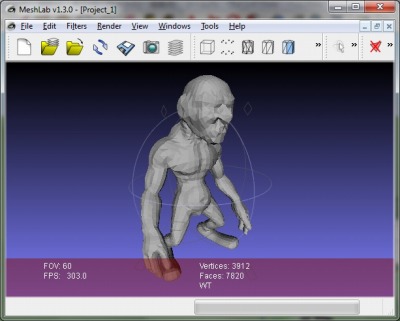
- サンプルでダウンロードしたモデルは、MeshLabなど、一般の3Dモデルビュワーで見るとこんな感じ。

-
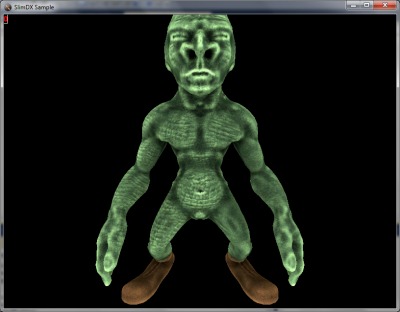
- これにdds形式のテクスチャを貼ったイメージを表示する。
- まず、referenceにcolladaloader.dllを追加する。
- 例:C:\3dview\ColladaLoader\bin\Debug\colladaloader.dll
- 次に、SimpleModel10Sample.csを開き、以下のように変更を加える。
- ColladaLoaderをインポートする
using ColladaLoader;
ColladaFile Test;
- OnResourceLoad()関数の最後に、以下を追加
CreatePrimaryRenderTarget();
view = Matrix.LookAtLH( new Vector3( 0, 0, -10 ), new Vector3( 0, 0, 0 ), Vector3.UnitY ); jupiterMesh.Effect.GetVariableByName( "view" ).AsMatrix().SetMatrix( view );
proj = Matrix.PerspectiveFovLH( 45.0f, WindowWidth / (float)WindowHeight, 0.1f, 1000.0f ); jupiterMesh.Effect.GetVariableByName( "proj" ).AsMatrix().SetMatrix( proj );
Test = new ColladaFile("Goblin", new Vector3(0.0f, -50.0f, 100.0f), Context10.Device);
Test.SetProjection(proj);
- onResourceUnload()の最後に以下を追加。
Test.Dispose();
Context10.Device.ClearState();
rotation += (float)( Math.PI / 4.0f * FrameDelta );
Context10.Device.OutputMerger.BlendState = transBlendState;
jupiterMesh.Draw();
Test.SetView(view);
Test.Render();

問題点
- ただ、google 3D warehouseからのファイルをdaeに変換したのだと使えなかった。
- effectも、textureももう少し仕組みを学ばなくちゃ先に進めない。

